A gallery wall is a timeless way to fill a blank space with personality and style. But when you introduce modern acrylic prints into the mix, the rules can feel a little different. You love the sleek, vibrant look of acrylic, but you’re not sure how to arrange multiple pieces without the wall looking chaotic or misaligned. Questions about spacing, layouts, and balance can quickly turn an exciting project into a daunting one.
Creating a beautiful gallery wall acrylic display is all about smart planning. With the right approach to layout and spacing, you can design a collection that looks cohesive, professional, and perfectly curated. This guide will provide you with a step-by-step plan to arrange your acrylic prints with confidence.
Step 1: Curate Your Collection
Before you think about hanging, you need to decide what to hang. A successful gallery wall tells a story or follows a theme. This unifying element is what separates a polished collection from a random assortment of pictures.
- Choose a Theme: Your theme could be family portraits, travel photography, abstract art, or nature scenes. A consistent subject matter will instantly tie your gallery wall acrylic prints together. You could even arrange them to tell a story using chronological photo frame wall ideas.
- Select a Color Palette: Another powerful unifying tool is color. You can opt for all black-and-white prints, photos with a similar filter, or pieces that share a few complementary colors. This creates a harmonious look, even if the subjects vary. The principles of choosing colors for your room decor can be a great help here.
Step 2: Choose Your Layout Style
There is no single “correct” way to arrange a gallery wall. The layout you choose will define the personality of your space. The two most popular styles are the grid and the salon-style hang.
The Grid Layout
The grid (or symmetrical) layout is clean, orderly, and modern. It involves hanging prints of the same size and orientation in a perfect grid pattern. This style is ideal for creating a formal, sophisticated look. The sleek, frameless nature of a gallery wall acrylic display lends itself perfectly to the precision of a grid.
The Salon-Style Layout
The salon-style (or asymmetrical) layout is more eclectic and playful. It involves mixing prints of various sizes and orientations to create a display that feels more organic and personal. This style is perfect for showcasing your creativity and is a fantastic way of mixing frame sizes and orientations.
| Layout Style | Best For | Key Characteristic |
| Grid | Formal spaces, modern aesthetic, creating a sense of order. | All prints are the same size with uniform spacing. |
| Salon-Style | Expressing personality, eclectic decor, filling irregularly shaped walls. | Prints of various sizes and shapes arranged artfully. |
Step 3: The Importance of Spacing
Spacing is the secret ingredient to a professional-looking gallery wall. It’s the negative space between your prints that allows each piece to breathe and prevents the display from feeling cluttered.
The Golden Rule of Spacing: Be Consistent.
Whether you choose a tight 2-inch gap or a more airy 4-inch one, the most important thing is to keep that spacing consistent between all the prints in your gallery wall acrylic collection.
- For Grid Layouts: Uniform spacing is non-negotiable. A 2-3 inch gap is standard and creates a clean, architectural look.
- For Salon-Style Layouts: While the prints themselves are different sizes, the space between them should remain relatively uniform. This creates a sense of rhythm and intention, tying the eclectic collection together.
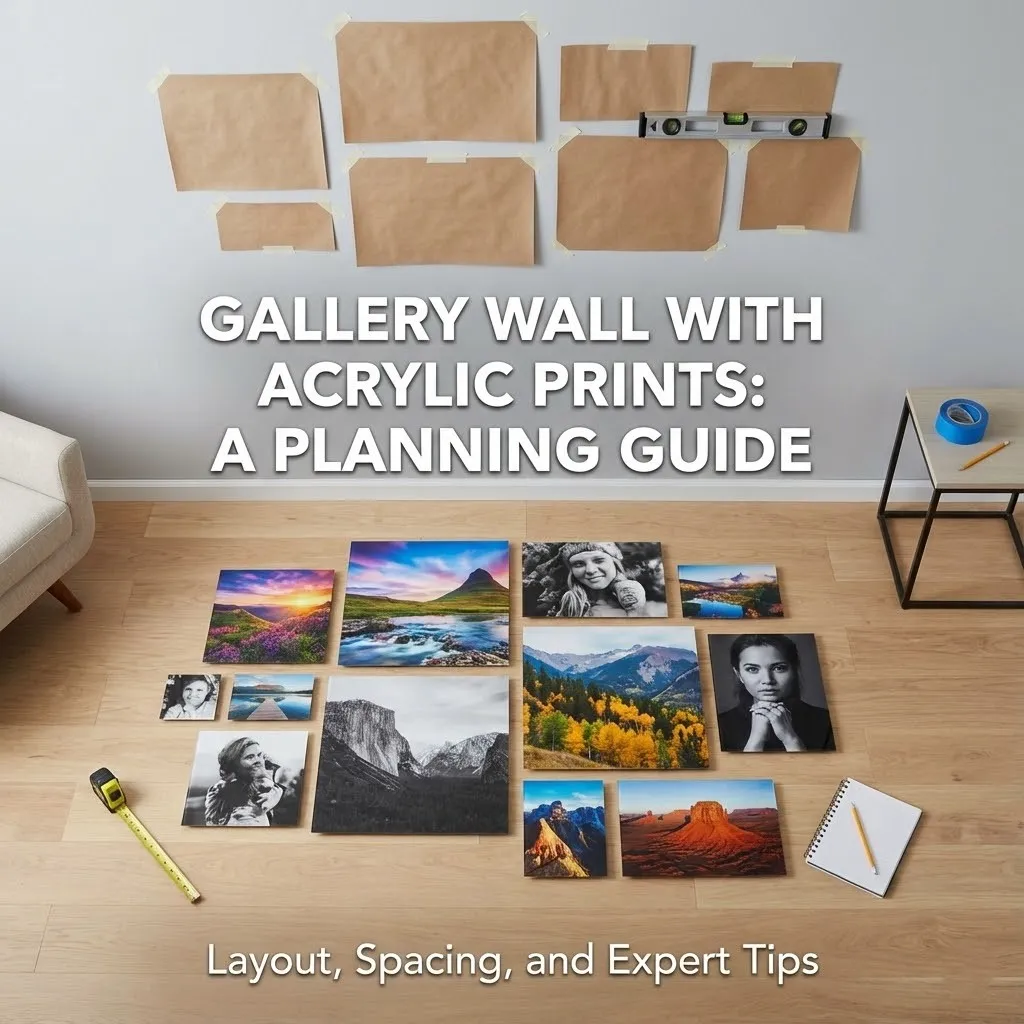
Step 4: Plan Your Layout on the Floor
This is the most crucial step for avoiding unnecessary holes in your wall. Before you pick up a drill, lay all your acrylic prints out on the floor.
- Define Your Space: Measure the area on your wall where the gallery will go. Use painter’s tape on the floor to mark out a box of the same dimensions.
- Arrange and Rearrange: Start by placing your largest print (your anchor piece) first, typically slightly off-center. Then, arrange the smaller prints around it. Play with different combinations until you find a layout that feels balanced and pleasing to the eye.
- Check Your Spacing: Use a tape measure to ensure the spacing between each piece is consistent according to your plan. Adjust as needed.
Step 5: Transfer Your Layout to the Wall
Once you are happy with your floor arrangement, it’s time to transfer it to the wall.
- Create Paper Templates: Trace each acrylic print onto craft paper or newspaper and cut them out. Label them so you know which is which.
- Tape Templates to the Wall: Using your floor layout as a guide, tape the paper templates to the wall with painter’s tape. This is your final chance to make adjustments.
- Check the Height: Use a level to ensure everything is straight. As a general rule, the center of the entire gallery should be at eye level, which is about 57-60 inches from the floor. This is a key principle from our guide on frame placement tips.
- Mark Your Holes: Once you’re satisfied, mark the drill holes for your standoff hardware directly through the paper templates. Then, remove the paper and hang your prints.
Your Wall, Your Story
A gallery wall acrylic display is a powerful way to infuse your home with modern style and personal meaning. By taking the time to plan your theme, layout, and spacing, you can move beyond the fear of making mistakes and create a stunning feature wall with confidence.
Ready to start building your collection? Explore our custom acrylic prints and begin designing the gallery wall you’ve always wanted.
Frequently Asked Questions (FAQ)
Q: How far apart should pictures in a gallery wall be?
A: A consistent spacing of 2 to 4 inches between each piece is a good rule of thumb. The most important thing is that the spacing is uniform throughout the entire arrangement to create a cohesive look.
Q: Should a gallery wall be symmetrical?
A: Not necessarily. A symmetrical (grid) layout is great for a formal, modern look. An asymmetrical (salon-style) layout offers a more eclectic and personal feel. Your choice depends on your style and the prints you’re displaying.
Q: Where do you start when hanging a gallery wall?
A: Always start with your largest or most important piece, known as the “anchor piece.” Place it in a primary position (often slightly off-center) and then build the rest of the gallery around it.
Q: Can I create a gallery wall with acrylic prints in a small space?
A: Yes! A well-planned gallery wall acrylic display can work beautifully in a small apartment. Consider a vertical arrangement to draw the eye upward or a tight grid to maintain a sense of order. You can find more tips in our guide to decorating small spaces with photo frames.
Q: Can I mix acrylic prints with framed art?
A: Absolutely. Mixing the sleek, frameless look of acrylic with traditional frames adds texture and interest. The key is to find a unifying element, like a shared color palette, to tie the different media together.
Q: What about multi-panel art like a triptych?
A: A triptych can be a stunning centerpiece for a larger gallery wall. Treat the three panels as one single anchor piece and arrange smaller prints around it. You can find more inspiration with these 2-photo and 3-photo frame ideas.
Q: Should I worry about glare on a gallery wall of acrylic prints?
A: In a room with a lot of direct light, the glossy finish of acrylic can cause reflections. If this is a concern, consider using a non-glare acrylic finish to reduce reflections, which will help elevate your photographic prints.