You’ve found the perfect piece of art, but now comes the tricky part: getting it on the wall. Hanging artwork can feel surprisingly high-stakes. Go too high, too low, or off-center, and the entire balance of your room can feel off. Many people simply guess, leading to misplaced nail holes and frustration.
But what if you could hang your art perfectly on the first try? This guide is packed with professional wall art hanging tips that designers use to create beautiful, balanced interiors. We’ll cover everything from the ideal height to placement over furniture, so you can display your pieces with confidence.
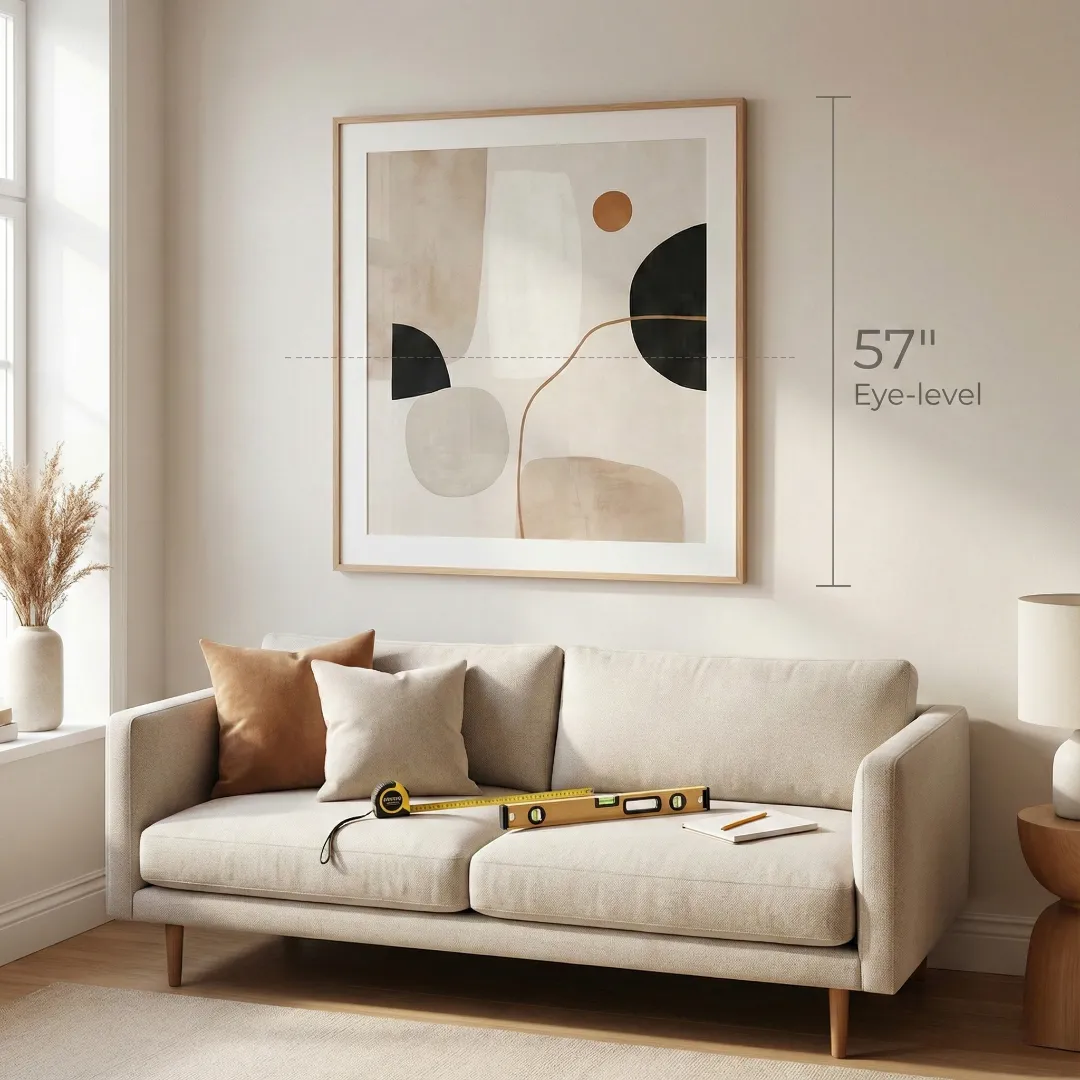
The Golden Rule: Hang Art at Eye Level
If you remember only one of these wall art hanging tips, make it this one. Art should be hung so that the center of the piece (or the entire gallery wall grouping) is at average eye level. For most people, this is between 57 and 60 inches from the floor.
Why this height? It ensures the art is comfortably viewable without having to crane your neck up or look down. It connects the art to the human scale of the room, making it feel integrated rather than like it’s floating.
How to Measure for Eye-Level Placement
- Find the Center: Measure the height of your artwork and divide by two to find its vertical center.
- Locate the Hanging Point: Measure the distance from the top of the frame to the hanging wire or hook on the back.
- Calculate Nail Height: Start with 57 inches. Add the distance from the center of the art to the top of the frame. Then, subtract the distance from the top of the frame to the hanging point. The result is where your nail should go.
Example:
- Your art is 30 inches tall. Its center is at 15 inches.
- The hanging wire is 4 inches from the top.
- Calculation: 57 inches (eye level) + 15 inches (half of art height) – 4 inches (wire drop) = 68 inches.
- Your nail goes 68 inches from the floor.
This formula ensures the center of your piece lands perfectly at 57 inches. For a simpler approach, check out these general frame placement tips.
Wall Art Hanging Tips for Specific Locations
The eye-level rule is a great starting point, but it needs adjustments depending on where you’re hanging the art. The relationship between your art and the furniture below it is critical for a cohesive look.
Above a Sofa
One of the most common places to hang art is over a sofa. A frequent mistake is hanging it too high, which creates a disconnect between the seating and the decor.
- Height: The bottom of the frame should be 6 to 8 inches above the back of the sofa. This creates a visual anchor.
- Width: Your artwork or gallery wall grouping should be about two-thirds the width of the sofa. This provides a sense of balance and scale.
Above a Bed or Headboard
Similar to a sofa, art above a bed should feel connected to it.
- Height: Aim for 6 to 8 inches above the top of the headboard. If you don’t have a headboard, hang it where a headboard would typically end.
- Width: The art should be noticeably narrower than the headboard to avoid looking top-heavy, but not so small that it gets lost. Again, the two-thirds rule is a great guideline.
In a Hallway or Entryway
Hallways are prime real estate for creating a visual journey. Here, the eye-level rule is your best friend. A series of frames can tell a story, and you might even consider chronological photo frame wall ideas for storytelling to guide visitors through your home.
On a Gallery Wall
Creating a gallery wall is an art in itself. It’s about more than just height; it’s about spacing and balance.
- Treat it as One Piece: The 57-inch rule applies to the entire grouping. Find the center point of your whole collection and use that as your eye-level mark.
- Spacing is Key: Keep the distance between frames consistent, typically 2 to 3 inches apart. This creates a clean, intentional look.
- Plan Ahead: Before making any holes, lay your frames on the floor to perfect the arrangement. You can even trace each frame onto kraft paper, cut them out, and tape them to the wall to visualize the layout. For more inspiration, explore ideas on mixing frame sizes and orientations.
Advanced Wall Art Hanging Tips from the Pros
Once you’ve mastered the basics, these professional tips can help you refine your displays and troubleshoot common issues.
Mind the Scale of Your Art
A tiny frame on a massive wall will look lost, while an oversized piece can overwhelm a small room. The scale of your art should be proportional to the wall space. Don’t be afraid to go big on a large wall! Conversely, a collection of smaller pieces can work well when grouped together, a strategy that works when decorating a small space with photo frames.
Consider the Room’s Function
In a dining room where people are mostly seated, you can hang your art slightly lower than 57 inches. In a living room, you might arrange smaller pieces on a console table. Thinking about how the room is used can inform your placement choices.
Use the Right Hardware
Make sure your hooks and nails can support the weight of your artwork, especially for heavy pieces. For drywall, using a stud finder to locate a secure hanging point is always a good idea. For very heavy art, wall anchors are a must.
Conclusion: Hang Your Art with Confidence
Hanging wall art doesn’t have to be an intimidating task. By following a few simple rules, you can transform your space and display your cherished pieces like a professional. Remember to hang art at eye level, maintain proper spacing above furniture, and ensure the scale is right for the room.
These foundational wall art hanging tips will help you create a home that feels balanced, personal, and beautifully curated. Now you can finally get those pieces out of storage and onto your walls where they belong.
Ready to find the perfect piece for your newly-mastered walls? Explore our collection of custom prints to start your next project.
Frequently Asked Questions (FAQ)
Q: What is the standard height to hang wall art?
A: The standard professional rule is to hang wall art so that its center is at average eye level, which is 57 to 60 inches from the floor. This makes viewing the art comfortable and natural.
Q: How far apart should I hang pictures in a group?
A: For a cohesive look in a gallery wall or grouping, keep the spacing between frames consistent. A gap of 2 to 3 inches is standard. This prevents the display from looking cluttered or too sparse.
Q: How high should I hang a picture over a couch?
A: The bottom of the frame should be 6 to 8 inches above the back of the couch. This creates a visual connection between the art and the furniture, making them feel like a single unit.
Q: What if I have very high ceilings?
A: Even with high ceilings, the 57-inch eye-level rule generally still applies. Hanging art too high to “fill the space” can make it feel disconnected. Instead, consider using larger, vertically oriented pieces or taller groupings that extend upwards while still being centered at eye level.
Q: Can I hang two pictures vertically?
A: Yes, hanging two pictures vertically is a great way to fill a narrow wall. When doing so, treat the pair as a single unit. Find the center point between the two frames and place that point at 57 inches from the floor, maintaining a 2-3 inch gap between them. You can explore different layouts with 2-photo & 3-photo frame ideas for inspiration.
Q: Should my art match my room’s decor?
A: It’s a matter of personal taste, but creating a cohesive look is often desirable. You can achieve this by choosing art that complements your color scheme. Learning how to choose frame colors for your room decor can help tie everything together, even if the art itself is different.Q: How do I hang pictures without making a mistake?
A: The best tip is to plan before you hang. Lay your art on the floor to finalize arrangements. You can also trace your frames onto paper, cut them out, and tape them to the wall. This allows you to visualize the placement and make adjustments without creating unnecessary nail holes.