Photobooks have become a beloved way to preserve cherished memories, whether it’s a wedding celebration, a family vacation, or your child’s first years. But traditional photobooks come with limitations, like awkward creases or details lost in the spine. Enter layflat photobooks, an innovative solution that opens up beautifully and allows for uninterrupted, seamless spreads.
If you’re thinking of creating a photobook that looks professional and lets your images shine, layflat binding might be what you need. This guide will walk you through everything you need to know about Layflat Photobook Design—from why it’s the perfect choice to how you can create one of your own.
What This Guide Covers
- What makes layflat photobooks unique
- How they enhance storytelling through seamless spreads
- Step-by-step tips to design your own layflat photobook
- Insights into printing options and finishing touches
Why Choose Layflat Photobooks?
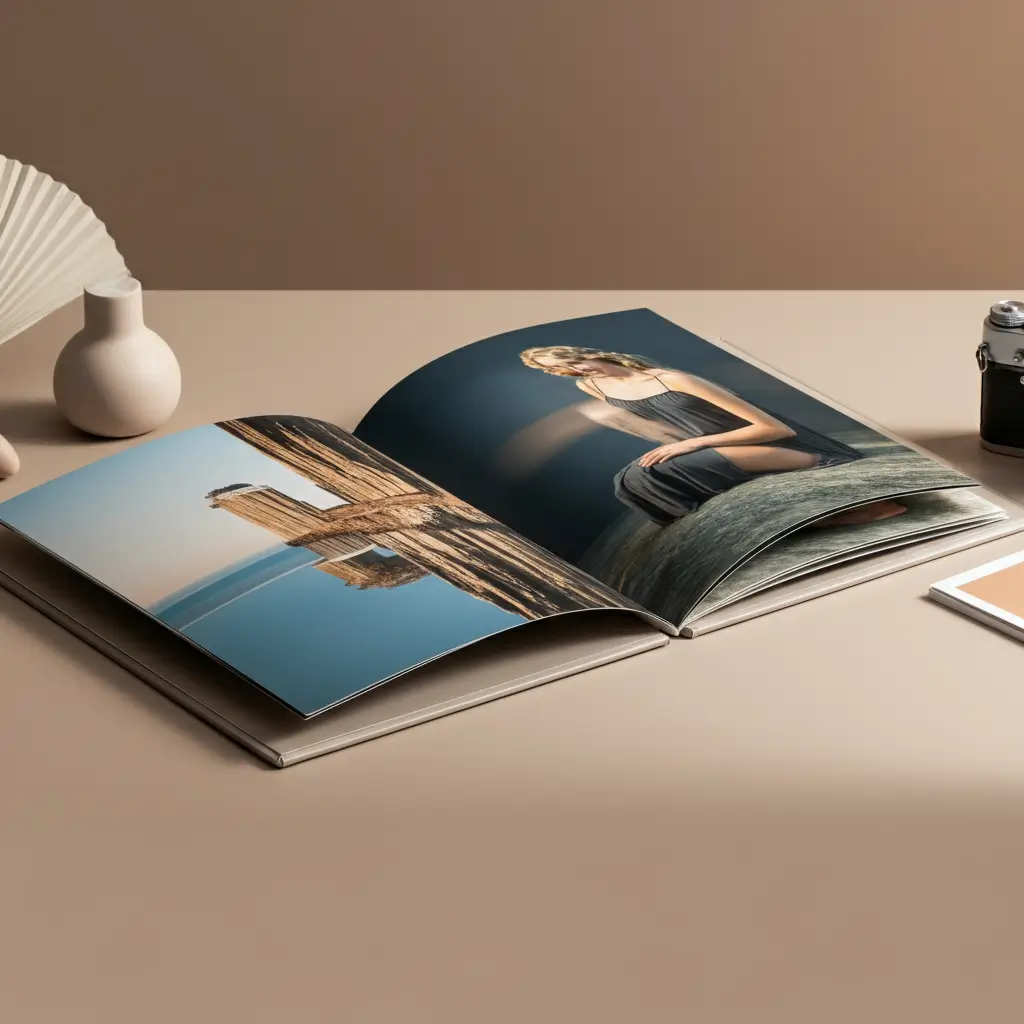
Layflat photobooks aren’t just a trend; they’re quickly becoming the gold standard for showcasing bold visuals and high-impact panoramas. You’ll love how images flow across the pages with no interruptions, perfect for wedding photos, landscapes, or any large-scale designs.
Designing a Layflat Photobook for Seamless Spreads
Designing a layflat photobook isn’t just about dropping images onto pages. To get a polished result, you’ll need to focus on layout, material, design principles, and even how you select your photos. Below, we’ll break this process into simple steps you can follow.
1. Understanding Layflat Photobook Basics
What Are Layflat Photobooks?
Layflat photobooks use custom binding techniques that eliminate the raised middle seen in traditional books. Pages lie completely flat when opened, which enhances panoramic images and eliminates visual gaps.
Key Benefits of Layflat Design
- Seamless Spreads: No visual interruptions between pages.
- Premium Aesthetic: Thicker pages and high-quality printing options add a professional touch.
- Durability: The bound edge is designed for longevity, even with frequent use.
Available Sizes and Formats
| Photobook Type | Common Dimensions | Best Use |
| Classic Layflat | 8×8 inches | Family albums, square layouts |
| Panoramic Spread Layflat | 11×14 inches | Large landscape or wedding spreads |
| Miniature Layflat | 6×6 inches | Compact travel or Instagram albums |
Many photobook services like TeoPrint and Shutterfly offer these sizing options to cater to various needs.
2. Organizing Your Photos
Before jumping into the design stage, it’s essential to curate your collection. Layflat photobooks thrive on storytelling and flow, so organizing is key.
Strategies for Curating Photos
- Choose High-Resolution Images: Layflat spreads amplify details. Aim for photos with at least 300 DPI or higher.
- Organize by Theme or Chronology: Group photos into themes like “Spring Vacation” or “Family Milestones.” Chronological layouts also create natural narratives.
- Select Wide-Angle Images for Spreads: Panoramic shots look stunning when stretched across two pages.
Tip for Selection
Less is more. Avoid overcrowding pages; give your images room to breathe and shine.
3. Designing the Layout
Your layout sets the foundation for a seamless, impactful presentation. Layflat books give you creative freedom with large, uninterrupted spaces, so design wisely.
Key Design Principles
- Rule of Thirds: Align key elements like people’s eyes or landscapes along vertical or horizontal thirds for balance.
- Minimalist Backgrounds: Use clean, minimal backgrounds to keep the focus on your images. White or subtle pastel tones work beautifully.
- Visual Hierarchy: Highlight key photos with larger spreads while grouping smaller images into collages.
| Layout Option | Best Scenarios |
| Full-Spread Images | Panoramic travel landscapes and significant events |
| Half-Page Collages | Family portraits, party sessions |
| Text + Image Pages | Use captions for storytelling |
Experiment with Photo Placement
Use design tools like Canva or Picaboo to experiment with placements. Platforms like these offer customizable templates explicitly tailored for layflat photobooks.
4. Adding Personal Touches
Adding text, quotes, or even interactive elements can elevate your photobook from great to unforgettable.
Text Placement Tips
- Keep text minimal to avoid overwhelming visuals.
- Use captions for specific photos, like “Our First Day in Paris” or “Grandpa’s Birthday Bash.”
- Fonts should match the tone of your book. For example, choose elegant cursive for wedding books or bold sans-serif for travel adventures.
Interactive Additions
Some modern photobook providers offer QR Code Integration, where scanning a code on one page displays a related video! Imagine flipping through your wedding album and watching the first dance video.
5. Choosing Printing and Binding Options
Your photobook’s quality depends on the materials and printers you choose. Not all layflat books are created equal!
Printing Checklist
- Color Accuracy: Consult your provider to match the exact hues of your photos.
- Paper Type: Options include Matte (soft and subtle), Glossy (vibrant and reflective), or Satin (balanced).
- Thickness: Layflat pages use sturdy, heavyweight paper to maintain flatness.
Recommended Layflat Photobook Providers
| Provider | Best Features | Starting Price |
| Mixbook | Custom templates and AR integration | $45+/book |
| TeoPrint | Premade template, Quality prints for long-term memory preservation | $20+/book |
| Saal Digital | Ultra-sharp printing with customizable binding options | $40+/book |
Actionable Insights for Beginners
Step-by-Step Guide to Designing a Layflat Photobook
- Start with the Story: Determine your album’s purpose. Is it a wedding book, anniversary gift, or baby’s first-year milestone?
- Organize Photos Chronologically: Use folders to arrange photos by themes or events.
- Use Online Tools: Platforms like Canva and TeoPrint offer beginner-friendly tools with drag-and-drop interfaces.
- Opt for Premium Paper: Always choose heavyweight materials for layflat designs to handle wear and tear.
- Test Your Layout Digitally: Before sending your photobook to print, view a digital proof for any alignment problems or color mismatches.
Tools & Resources
- TeoPrint: Build custom photobook layouts with beginner-friendly templates.
- Lightroom Mobile: Edit your photos professionally to enhance brightness, sharpness, and contrast.
- Shutterfly Deals: Check their promo section for discounts on layflat albums.
Final Thoughts
Creating a layflat photobook is not just about preserving memories; it’s about elevating them. By following the techniques laid out in this guide, you’re well on your way to designing a visually stunning, professional-quality album.
Why Opt for Layflat Photobooks?
They are perfect for showcasing panoramic shots, capturing every detail of precious moments, and creating cherished keepsakes that stand the test of time. Whether you’re a professional designer or a passionate hobbyist, layflat photobooks offer a canvas that brings your memories to life.
Start Creating Today
Visit platforms like Mixbook or explore resources on TeoPrint for tips on photobook trends. Don’t wait! Gather your favorite images and start designing a layflat photobook that will become a treasured part of your home.