Your wedding day is a whirlwind of unforgettable moments, from the quiet anticipation of getting ready to the joyous celebration on the dance floor. After the day is over, you’re left with hundreds, if not thousands, of beautiful photos. Choosing just one or two to frame feels impossible. How can you capture the full story of your special day in a single display?
This is where a wedding photo collage comes in. It allows you to weave together multiple moments into one beautiful, cohesive piece of art. This guide will walk you through everything you need to know to create a stunning wedding collage, from selecting the perfect photos to choosing a layout that tells your unique love story.
Why a Wedding Photo Collage is the Perfect Keepsake
While a photo album is a wonderful way to store all your pictures, a collage brings your story to life on your walls. It serves as a daily reminder of the joy, love, and laughter of your wedding day.
Here’s why a wedding photo collage is such a special choice:
- It Tells a Complete Story: You can showcase a range of emotions and events—the tearful vows, the first kiss, the candid laughter with friends, and the fine details you spent months planning.
- It’s a Space-Saver: Instead of a gallery wall with dozens of frames, you can combine your favorite shots into one impactful piece, which is great for decorating small spaces with photo frames.
- It’s a Beautiful Focal Point: A large, well-designed collage becomes a conversation starter and a stunning piece of personalized home decor.
- It Makes a Perfect Gift: A custom wedding collage is a thoughtful and sentimental gift for parents, in-laws, or even for your spouse on your first anniversary.
Step 1: Selecting the Perfect Photos for Your Collage
The first and most important step is choosing which photos to include. The goal is to create a balanced collection that captures the essence of your day. Don’t just pick the posed portraits; the candid moments are often the most powerful.
Key Photos to Include:
- The Main Portrait: Select one or two stunning portraits of you as a couple to be the anchor or focal point of the collage.
- Getting Ready: Photos of the bride putting on her dress or the groom adjusting his tie add a sense of anticipation.
- The Ceremony: Include key moments like walking down the aisle, exchanging rings, and the first kiss.
- The Details: Don’t forget the little things! Shots of the rings, the bouquet, the cake, and the table settings add texture and context.
- Family and Friends: Include photos of your wedding party, parents, and candid moments of guests enjoying themselves.
- The Celebration: Photos from the reception, like the first dance and speeches, complete the story.
Pro-Tip: Aim for a mix of close-ups, medium shots, and wide-angle photos. This variety helps to elevate your photographic prints and makes the overall collage more visually dynamic.
Step 2: Choosing a Layout for Your Wedding Photo Collage
Once you have your photos, it’s time to decide on a layout. The arrangement can be just as important as the photos themselves in telling your story.
Chronological Storyline
One of the most popular and meaningful layouts is a timeline. Arrange your photos in the order they happened, from getting ready in the morning to the grand exit at night. This creates a beautiful narrative that viewers can follow. This approach is one of the best for a chronological photo frame wall idea for storytelling.
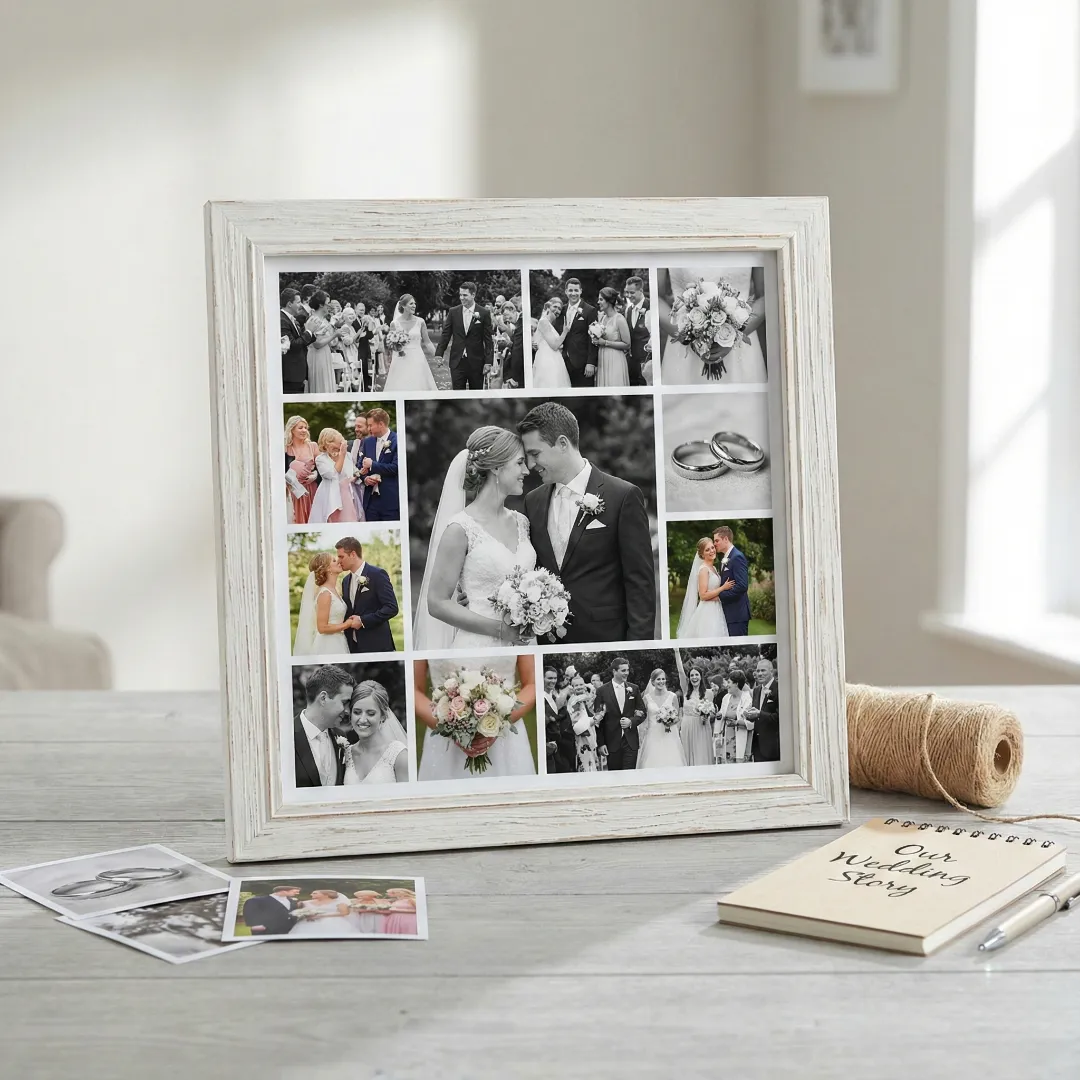
The Central Hero Image
This layout features one large, central photo (your “hero” shot) surrounded by several smaller supporting images. This is a great way to highlight your absolute favorite portrait while still including all the important details and moments around it.
Grid Layout
A classic grid is clean, modern, and symmetrical. You can choose a simple grid of squares or get creative by mixing frame sizes and orientations within the grid structure. This organized look is perfect for a contemporary home.
| Layout Style | Best For | Design Tip |
| Chronological | Telling the full story of the day | Arrange photos left-to-right or top-to-bottom. |
| Hero Image | Highlighting one perfect portrait | Place your best couple’s photo in the center. |
| Grid | A modern, clean, and balanced look | Keep spacing between photos consistent. |
Freestyle or Heart-Shaped
For a more romantic or whimsical feel, consider a freestyle layout where photos overlap, or arrange them into a heart shape. This adds a personal, handmade touch to your wedding photo collage.
Step 3: Designing and Printing Your Collage
With your photos and layout selected, you’re ready to design. You can use online design tools or services that specialize in creating custom collage prints.
Color and Tone
For a cohesive and professional look, consider the color scheme of your photos. You might choose to convert all the photos to black and white for a timeless, elegant feel. Alternatively, if your wedding had a strong color theme, select photos that highlight those colors. Be mindful of how the final collage will look with your existing decor; learning how to choose frame colors can provide helpful principles here.
Framing Your Collage
The final step is framing. A simple, elegant frame will ensure your photos remain the star of the show.
- Frame Color: Black, white, silver, or natural wood frames are classic choices that work well with wedding photos.
- Mat or No Mat: Adding a mat board can give your collage a more traditional, high-end look by creating a border around the prints. You can even cut your own mat board for a custom touch.
- Glass or Acrylic: Consider using a cover with a non-glare finish. For bright rooms, using non-glare acrylic frames is a great way to ensure your collage is visible from every angle.
Once framed, make sure you hang it properly. Following good frame placement tips will ensure your collage looks like a professional piece of art.
Conclusion: A Treasure for a Lifetime
A wedding photo collage is more than just a collection of pictures; it’s a celebration of your love story, artfully told in a single frame. It allows you to relive the magic of your special day every time you walk past it. By carefully selecting your photos and choosing a thoughtful layout, you can create a timeless keepsake that you and your family will treasure for years to come.
Ready to turn your beautiful wedding photos into a work of art? Explore our custom collage prints and start designing your perfect wedding keepsake today.
Frequently Asked Questions (FAQ)
Q: How many photos should I include in a wedding photo collage?
A: The ideal number depends on the size of the collage and the layout. A good range is between 10 and 25 photos. This allows you to tell a full story without the collage looking too cluttered. For smaller frames, stick to fewer images, like in these 2-photo & 3-photo frame ideas.
Q: Should I use only professional photos in my collage?
A: While professional photos will provide the best quality, don’t be afraid to mix in a few candid shots from friends or family if they capture a special, authentic moment. Just be sure they are high enough resolution to print clearly.
Q: Is it better to make a wedding collage or a photo album?
A: They serve different purposes, and many couples choose to have both. A photo album is comprehensive and holds all your memories, while a collage is a curated piece of wall art for daily enjoyment. Comparing a photo frame vs. a photo album can help you decide what’s best for you.
Q: What’s the best way to create a wedding photo collage online?
A: Many online platforms allow you to upload your photos into pre-made templates. Look for a service that offers high-quality printing and framing options. Using a dedicated collage maker can simplify the design process and ensure a professional result.
Q: Should my wedding collage be in color or black and white?
A: This is a personal style choice. Black and white offers a classic, timeless, and cohesive look. Color captures the vibrancy and real-life feel of the day. Some people opt for a mix, with a central color photo surrounded by black and white images.
Q: What size should my wedding photo collage be?
A: The size should be proportional to the wall space where you plan to hang it. A large collage (e.g., 24×36 inches) makes a great statement piece above a sofa or bed. Smaller collages can be perfect for a hallway or as part of a larger gallery wall.Q: What resolution do my photos need to be for a quality print?
A: For a sharp, clear print, your photos should be at least 300 DPI (dots per inch) at the final print size. Most professional wedding photos will be well above this resolution, but it’s something to check before you start designing.