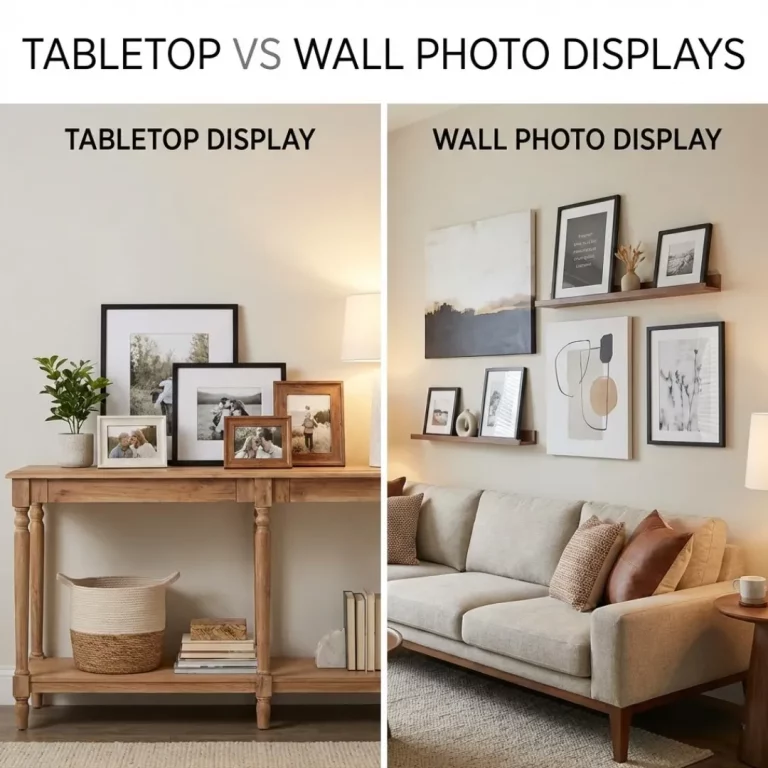
We all love capturing memories, but finding the right way to show them off can be a headache. You hammer a nail, hang a frame, step back, and realize it’s crooked. Or worse, you decide six months later that you want to rearrange everything, leaving your wall looking like a piece of Swiss cheese. The traditional gallery wall is beautiful, but it’s a commitment.
What if there was a way to display your photos that was flexible, stylish, and didn’t require a level every time you added a new picture? Enter the concept of a photo stand for wall displays—essentially, ledges, shelves, and rails that hold your frames for you.
These solutions act as a standing platform mounted to your wall, allowing you to lean, layer, and rearrange your art on a whim. No more holes, no more measuring tapes for every single frame. In this guide, we will explore how using a photo stand for wall decor can revolutionize your home’s aesthetic and save your drywall.
What is a Photo Stand for Wall Display?
When we talk about a photo stand for wall applications, we aren’t talking about the kickstand on the back of a frame. We are referring to horizontal supports—like picture ledges, floating shelves, or rails—that are mounted to the wall to hold frames upright.
Unlike traditional hanging methods where the frame hangs from a nail, a photo stand for wall displays supports the frame from the bottom. This allows you to lean frames against the wall, creating a casual, layered, and gallery-like feel.
Why Choose a Wall Stand Over Traditional Hanging?
- Flexibility: You can swap photos in seconds. Did you get a new school portrait? Just place it on the ledge.
- Layering: You can overlap frames of different sizes for a designer look.
- Less Damage: You only need to drill holes for the ledge itself, not for every individual picture frame.
- Modern Aesthetic: It creates clean horizontal lines that can make a room feel wider and more organized.
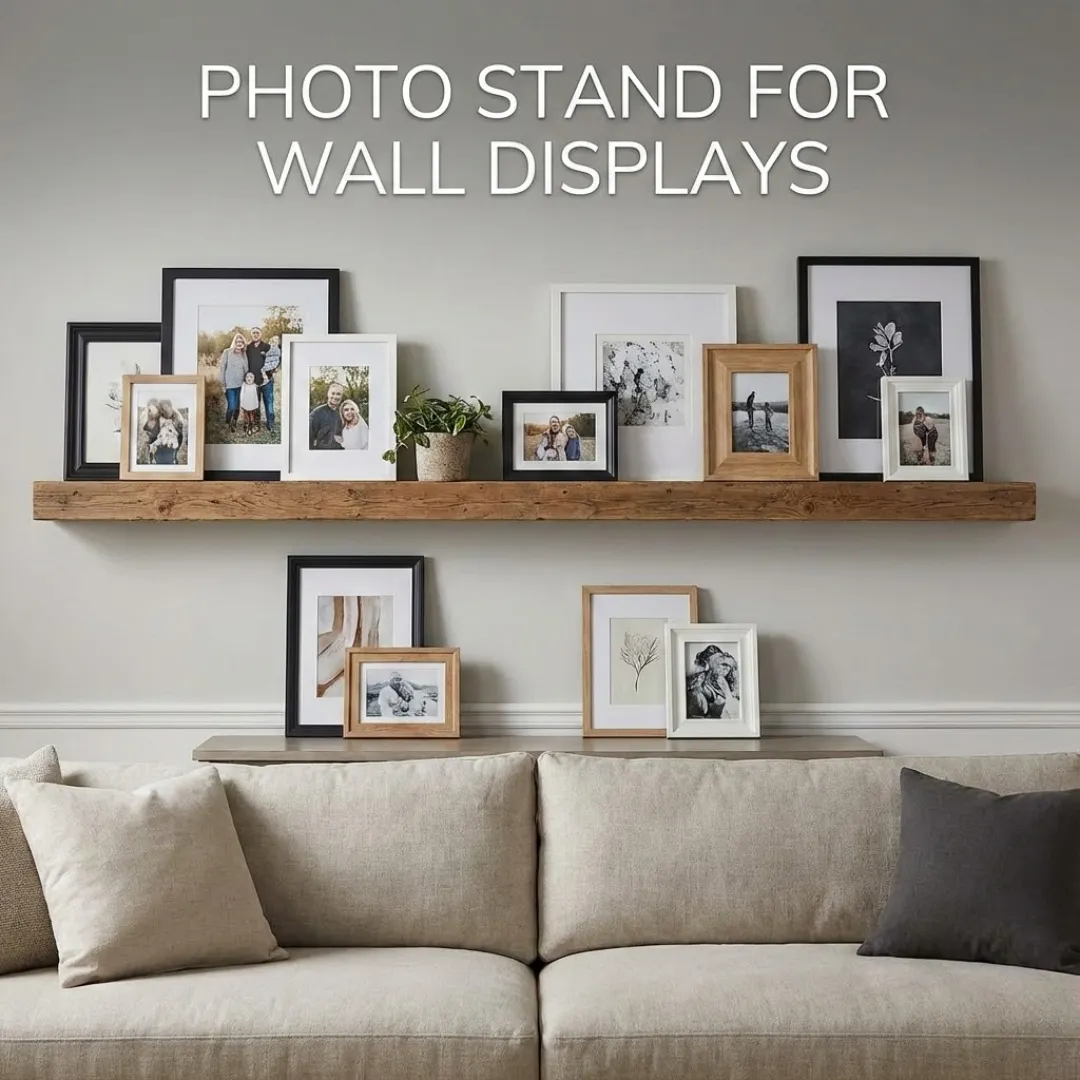
The Picture Ledge: The Classic Choice
The most popular form of a photo stand for wall displays is the picture ledge. These are narrow shelves with a small lip on the front to prevent frames from sliding off.
Styling Your Ledge
Picture ledges are incredibly versatile. You can install a single long ledge for a minimalist statement or stack multiple shorter ledges for a vertical gallery effect. This flexibility is perfect for creating dynamic hallway photo displays where space might be tight but visual impact is needed.
Pro-Tip: Don’t just stick to photos. Mix in other objects like small potted plants, candles, or vinyl records to add texture and depth.
Layering for Depth
The key to a professional-looking ledge is layering. Place your largest frames at the back and layer smaller frames in front, slightly overlapping them. This creates a cozy, collected vibe that feels effortless. If you need inspiration on frame styles, check out our guide on wall frame ideas to mix and match textures.
Innovative Hanging Solutions Beyond the Ledge
While ledges are great, they aren’t the only option. There are other creative ways to create a photo stand for wall setup that adds personality to your space.
1. Rail Systems
Gallery rails are often used in museums. A rail is mounted near the ceiling, and wires hang down to hold your art. While technically hanging, it functions similarly to a stand because you can slide the wires horizontally and adjust the height without making new holes.
2. Floating Shelves
Deeper than a standard picture ledge, a floating shelf offers more room for décor. This is an excellent choice if you want to mix heavy items like books with your photos. It allows for a more substantial display, perfect for an entryway wall art moment where you want to make a grand entrance.
3. Acrylic Shelves
For a truly modern, “invisible” look, clear acrylic shelves act as a sleek photo stand for wall decor. They let the artwork shine without adding visual clutter. This pairs beautifully with other modern materials; consider learning about acrylic wall art vs canvas to see what prints would look best on clear shelves.
Choosing the Right Location
Where you install your photo stand for wall display matters just as much as what you put on it.
Living Rooms and Dens
A long ledge above a sofa is a classic design move. It fills the empty vertical space and creates a focal point. Since this is a high-traffic area, you might want to look into how to arrange an acrylic photo wall to ensure your layout feels balanced.
Staircases
Staircases are notoriously difficult to decorate because of the angles. Installing staggered ledges that follow the slope of the stairs is a brilliant hack. It’s much easier than trying to align a grid of frames on a diagonal. For more specific tips on this tricky area, read our guide on creating a staircase wall gallery.
Small Apartments
In smaller spaces, floor space is premium. A photo stand for wall displays gets your decor off the floor and furniture. Utilizing vertical space is a key strategy discussed in our article on small apartment wall art.
Installation Tips for Safety
Even though ledges save your walls from Swiss-cheese syndrome, they still need to be installed securely.
- Find the Studs: Since ledges can hold a significant amount of weight (frames + glass), it is crucial to anchor them into wall studs.
- Use Proper Anchors: If you can’t hit a stud, use high-quality drywall anchors rated for the weight of your shelf and frames.
- Check for Level: A crooked ledge will make all your photos look crooked. Use a spirit level during installation.
If you are dealing with heavier items or large acrylic blocks, you definitely need to know how to securely hang heavy frames to avoid accidents.
Damage-Free Options
Renters, rejoice! If you cannot drill holes at all, there are still ways to create a photo stand for wall effect.
- Adhesive Ledges: Some lightweight plastic ledges come with command-strip style backings. These are great for very light frames or foam board prints.
- Leaning Floor Mirrors/Art: While not a wall-mounted stand, leaning large art against the wall from the floor or a console table creates a similar “stand” effect without any installation.
For more renter-friendly ideas, explore our suggestions for damage-free hanging photo frames.
Conclusion: Stand Up for Your Art
Switching to a photo stand for wall display system gives you the freedom to curate your home like a gallery. Whether you choose a classic wooden picture ledge, a modern acrylic shelf, or a professional rail system, you gain the ability to change your decor as often as you change your mind.
It’s a practical, stylish, and flexible solution that puts the focus back on your memories, not on the mounting hardware. So grab a ledge, gather your favorite prints, and start styling your masterpiece today.
Frequently Asked Questions (FAQ)
Q: How deep should a photo stand for wall display be?
A: A standard picture ledge typically has a usable depth of about 2 to 4 inches. This is enough space to lean frames and layer them slightly. If you plan to display thicker items like books or chunky acrylic blocks, look for a “floating shelf” which usually has a depth of 6 inches or more.
Q: Can I use a photo stand for heavy framed art?
A: Yes, but installation is key. A photo stand for wall use must be drilled into wall studs to support heavy items. If you are just using drywall anchors, check the weight rating carefully. Alternatively, consider using lightweight frames or acrylic prints to reduce the load.
Q: How high should I hang my picture ledge?
A: If it’s above a sofa, aim for 6 to 10 inches above the back of the couch. If it’s a standalone display on an empty wall, the center of the arrangement should be at eye level, roughly 57 to 60 inches from the floor.
Q: Do items slide off picture ledges easily?
A: Most picture ledges are designed with a small lip at the front edge specifically to stop frames from sliding forward. However, in high-traffic areas or homes with active pets/children, you can use a small bit of museum putty on the bottom of the frames for extra security.
Q: Can I mix different frame styles on a single ledge?
A: Absolutely! Mixing frame colors, materials, and sizes is one of the best ways to style a ledge. It creates an eclectic, curated look. You can also mix in unframed custom acrylic wall art panels for a modern touch among traditional frames.
Q: Is a photo rail better than a ledge?
A: It depends on your aesthetic. A ledge is more like a shelf and adds a horizontal architectural element. A rail is more discreet and allows you to float art in the middle of the wall. Rails are often preferred for very high ceilings or when you want to change the vertical height of artwork frequently.
Q: Can I put a photo stand in the kitchen?
A: Yes! A ledge in the kitchen is perfect for displaying cookbooks, small art prints, or even spices. It keeps items off the counter while adding personality. Just make sure the materials are easy to wipe down, similar to choosing moisture-resistant acrylic wall art for humid areas.