We have all stared at a blank shelf, a few photos in hand, and felt that sudden wave of design paralysis. You put a frame down, step back, and it looks lonely. You add another, and suddenly it looks cluttered. Achieving that effortless, “curated” look you see in magazines is harder than it appears.
Traditional frames can be tricky because of their kickstands and bulky borders. But if you have upgraded to modern acrylic blocks, you have a secret weapon in your design arsenal. An acrylic block display offers a sleek, frameless aesthetic that naturally catches the light and adds depth to any room.
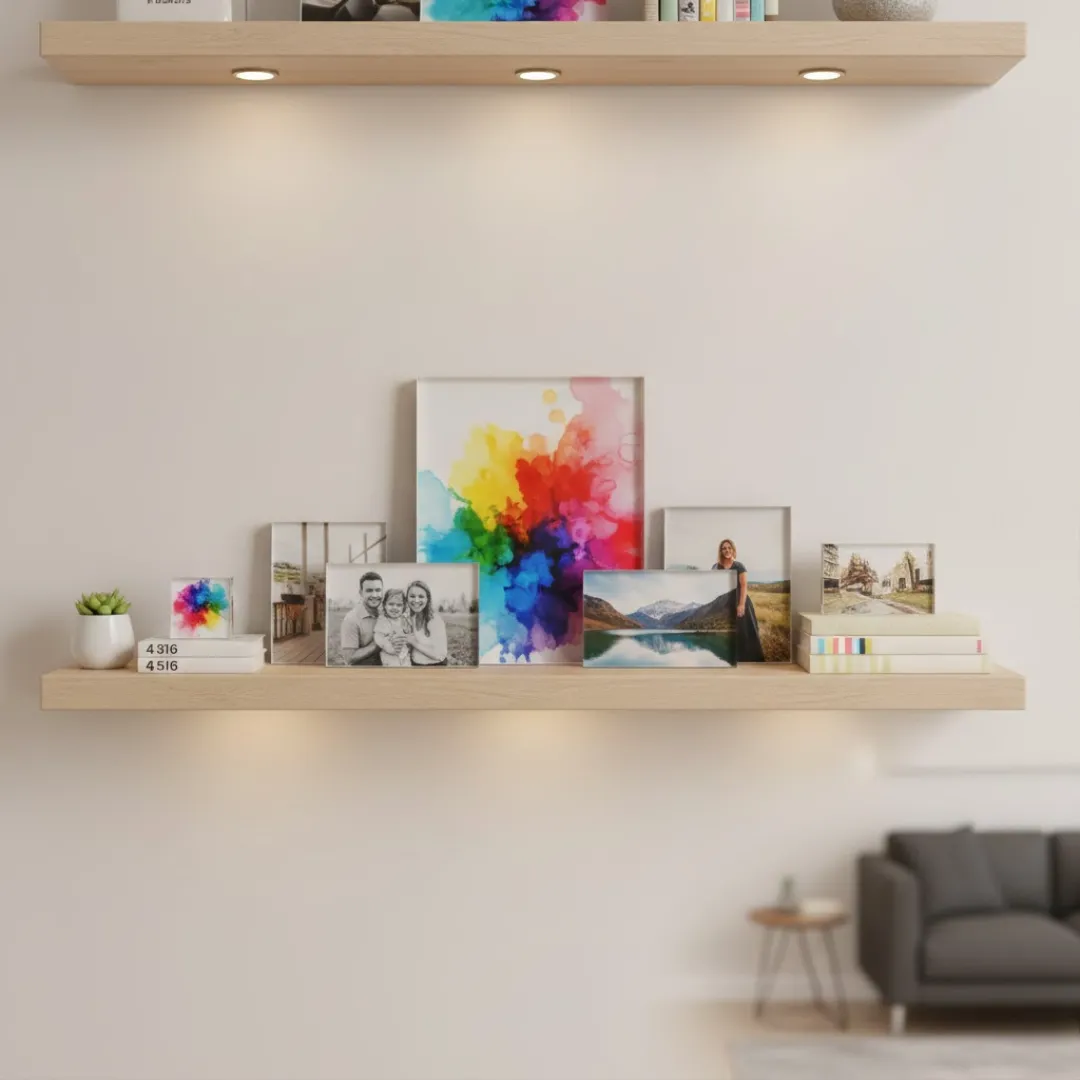
However, even the most beautiful photo blocks need the right arrangement to truly shine. Whether you are styling a floating shelf in the living room or a bookcase in the office, the way you group and layer your items matters.
In this guide, we will walk you through the secrets of styling an acrylic block display. From the “Rule of Thirds” to mixing textures, these practical tips will help you transform your shelves from messy to mesmerizing.
Why Choose an Acrylic Block Display?
Before we dive into styling, let’s look at why acrylic blocks are such a game-changer for shelf styling. Unlike traditional frames, acrylic blocks are free-standing, solid prisms.
- Self-Standing Stability: They don’t need easels or leaning posts. They sit solidly on any flat surface, making them perfect for narrow ledges.
- Light Refraction: The thick acrylic catches light from all angles, illuminating the image from within.
- Visual Weight: They add a premium, substantial feel to your shelves without the visual clutter of heavy wooden or metal frames.
While luxury acrylic wall art makes a big statement on a large wall, an acrylic block display brings that same high-end feel to your tabletop and shelf decor.
Step 1: Planning Your Layout
Great design rarely happens by accident. Before you start placing items, take a moment to plan your layout. A successful acrylic block display relies on balance.
The Triangle Method
Designers often use imaginary triangles to group objects. Instead of lining everything up in a straight row (which can look stiff and boring), try to create peaks and valleys.
- Place a tall object (like a vase or a large acrylic block) in the center or slightly off-center.
- Flank it with smaller items on either side.
- This draws the eye up and down, creating movement.
The Rule of Odds
For some reason, the human eye finds odd numbers more pleasing than even ones. Grouping your acrylic blocks in sets of three or five often looks more natural than groups of two or four.
- Try this: Group one large vertical block with two smaller horizontal ones.
Step 2: Mixing and Matching Sizes
Uniformity can be the enemy of interest. If every photo on your shelf is a 4×6 horizontal shot, the display will feel flat. To create a dynamic acrylic block display, you need variety.
Vary the Orientation
Mix landscape (horizontal) and portrait (vertical) orientations. This prevents the “soldier line” effect where everything looks like it is standing at attention.
Vary the Dimensions
Combine different sizes to create depth. Place a larger 8×10 block towards the back and layer a smaller 4×6 or 5×7 block slightly in front of it. Because acrylic is transparent, this layering effect looks stunning rather than blocked. This technique works similarly to how you might arrange custom acrylic wall art in a gallery wall layout, but on a smaller scale.
Step 3: Layering with Other Textures
An acrylic block display is beautiful, but too much acrylic can feel cold or clinical. To warm it up, you need to introduce contrasting materials.
Soften with Organic Elements
Acrylic is smooth, hard, and glossy. Balance this by adding:
- Plants: A small succulent or trailing ivy adds softness and life.
- Wood: A wooden bowl or stack of books adds warmth.
- Fabric: Placing blocks on a textured runner can ground the display.
Mix with Books and Art
Don’t just use photos. Treat your shelf like a mixed-media gallery. Stack two hardcover books horizontally and place a small acrylic block on top as a pedestal. This elevation change is a pro move for shelf styling.
Step 4: Playing with Light
One of the biggest advantages of an acrylic block display is how it interacts with light. You want to place your blocks where they can capture natural or artificial light to make the images pop.
- Near Windows: Natural light entering from the side will refract through the edges of the block, making the photo appear to glow.
- Under Shelf Lighting: If you have built-in lights, place the blocks directly under them.
- Avoid Direct Backlight: Placing a block directly in front of a bright window might silhouette the image, making it hard to see. Side lighting is always best.
This interplay of light is similar to the effect achieved with fine art acrylic prints, where lighting is key to revealing the depth of the print.
Step 5: Color Coordination
While you don’t need every photo to match perfectly, a little color coordination goes a long way.
- Black and White: A collection of black and white photos in acrylic blocks creates a timeless, sophisticated look that fits any room.
- Theme Colors: If your room has blue accents, choose photos that feature sky or water.
- Consistent Filters: If you are printing photos from your phone, use the same filter on all of them before printing to create a cohesive visual language.
Keeping a consistent color palette helps your acrylic block display feel intentional, much like following the latest acrylic wall decor trends for 2025.
Common Mistakes to Avoid
Even with the best intentions, it’s easy to go wrong. Here are a few pitfalls to watch out for.
| Mistake | Why it fails | The Fix |
|---|---|---|
| Overcrowding | It looks messy and hides the photos. | Leave “negative space” (empty gaps) between groups. |
| Too High/Low | No one can see the images. | Keep blocks at eye level or slightly below. |
| Ignoring Depth | Placing everything in a single line is boring. | Pull some items forward and push others back. |
| Clashing Styles | Mixing rustic wood frames with sleek acrylic blocks. | Stick to modern materials or use contrasting textures intentionally. |
Specialized Shelf Ideas
Different shelves call for different approaches.
The Floating Shelf
Floating shelves are minimalist and clean. Keep your acrylic block display simple here. A single row of 3-5 blocks with plenty of breathing room works best. This is a great solution for acrylic wall art for rentals where you want to add personality without drilling too many extra holes.
The Deep Bookcase
Here, you have room to play. Push books to the back of the shelf and place acrylic blocks in front of them. Or, use the blocks as bookends. Just ensure the blocks are heavy enough to hold the books up!
The Bedroom Ledge
A picture ledge above the bed is a classic spot. Because ledges are narrow, you can’t layer deep items. Instead, overlap the edges of the blocks slightly. A large landscape block behind a smaller square one creates a cozy, layered look. See our guide on acrylic wall art for bedrooms for more inspiration on creating a restful atmosphere.
Conclusion
Creating a gallery-worthy acrylic block display doesn’t require an interior design degree. It simply requires a bit of planning and a willingness to experiment. By varying heights, layering textures, and playing with light, you can turn a simple shelf into a stunning focal point.
Acrylic blocks are more than just photo frames; they are modern design elements that elevate your memories. So clear off that shelf, grab your favorite photos, and start styling a display that tells your story in 3D.
Frequently Asked Questions (FAQ)
Q: How do I keep acrylic blocks from scratching on rough shelves?
A: If you have rough wood or stone shelves, place small, clear rubber bumpers (often used for cabinet doors) on the bottom corners of your acrylic block. This lifts the block slightly and protects the bottom surface from scratches.
Q: Can I mix acrylic blocks with traditional frames?
A: You can, but it requires careful styling. The sleekness of acrylic contrasts sharply with heavy wood or ornate metal. If you want to mix them, try to stick to thin, modern metal frames in black or silver to bridge the gap. For more on this comparison, read about acrylic wall art vs. framed photos.
Q: How do I clean dust off my display?
A: Dust loves acrylic. Use a microfiber cloth to gently wipe the blocks. Avoid feather dusters which can just move dust around or scratch the surface. An anti-static plastic cleaner can help repel dust for longer.
Q: Is it safe to put acrylic blocks on a high shelf?
A: Acrylic is shatter-resistant, making it safer than glass. However, solid acrylic blocks can be heavy. Ensure your shelf is properly anchored and sturdy enough to support the weight, similar to the precautions needed for hanging acrylic wall art.
Q: What is the best background color for an acrylic block display?
A: Since the blocks are transparent, the wall color behind the shelf will show through. Neutral walls (white, gray, cream) allow the photos to stand out best. If you have a busy wallpaper, the transparency of the block might make the photo hard to read.
Q: Can I use acrylic blocks in a bathroom?
A: Yes! Acrylic is moisture-resistant and won’t warp like wood or rust like metal. It’s a fantastic choice for adding decor to bathroom shelves.
Q: How do I light a shelf display without wiring?
A: Use battery-operated puck lights or LED strips. You can stick them to the underside of the shelf above to cast a glow down onto your acrylic block display.