Your camera roll is a treasure chest of memories, but keeping them locked away on a device doesn’t do them justice. You want to bring them to life in a way that tells a story, combining multiple moments into one beautiful display. The idea of creating a photo collage online is exciting, but the process might seem technical or complicated.
From choosing the right software to arranging your photos and preparing the file for a high-quality print, where do you even begin? This step-by-step guide will demystify the process. We will walk you through everything you need to know to design a professional-looking photo collage online and turn it into a breathtaking acrylic print for your home.
Step 1: Curate Your Photos and Define a Theme
Before you open a single design tool, the most important step is deciding what story you want to tell. A collage with a clear theme is much more impactful than a random collection of images. A strong narrative thread will guide your photo choices and result in a more cohesive final piece.
Ideas for your collage theme:
- A tribute to your family, mixing old and new portraits.
- Highlights from a memorable vacation or road trip.
- A “year in review” that captures your favorite moments.
- Celebrating a milestone like a graduation, wedding, or anniversary.
- A collection of your pet’s cutest and funniest moments.
Once you have a theme, gather your photos. Prioritize high-resolution images, as they will produce the clearest and sharpest print. This is especially important for acrylic printing, which highlights every detail. If you need help narrowing down your choices, our guide on how to choose photos for a photobook offers excellent tips that also apply here.
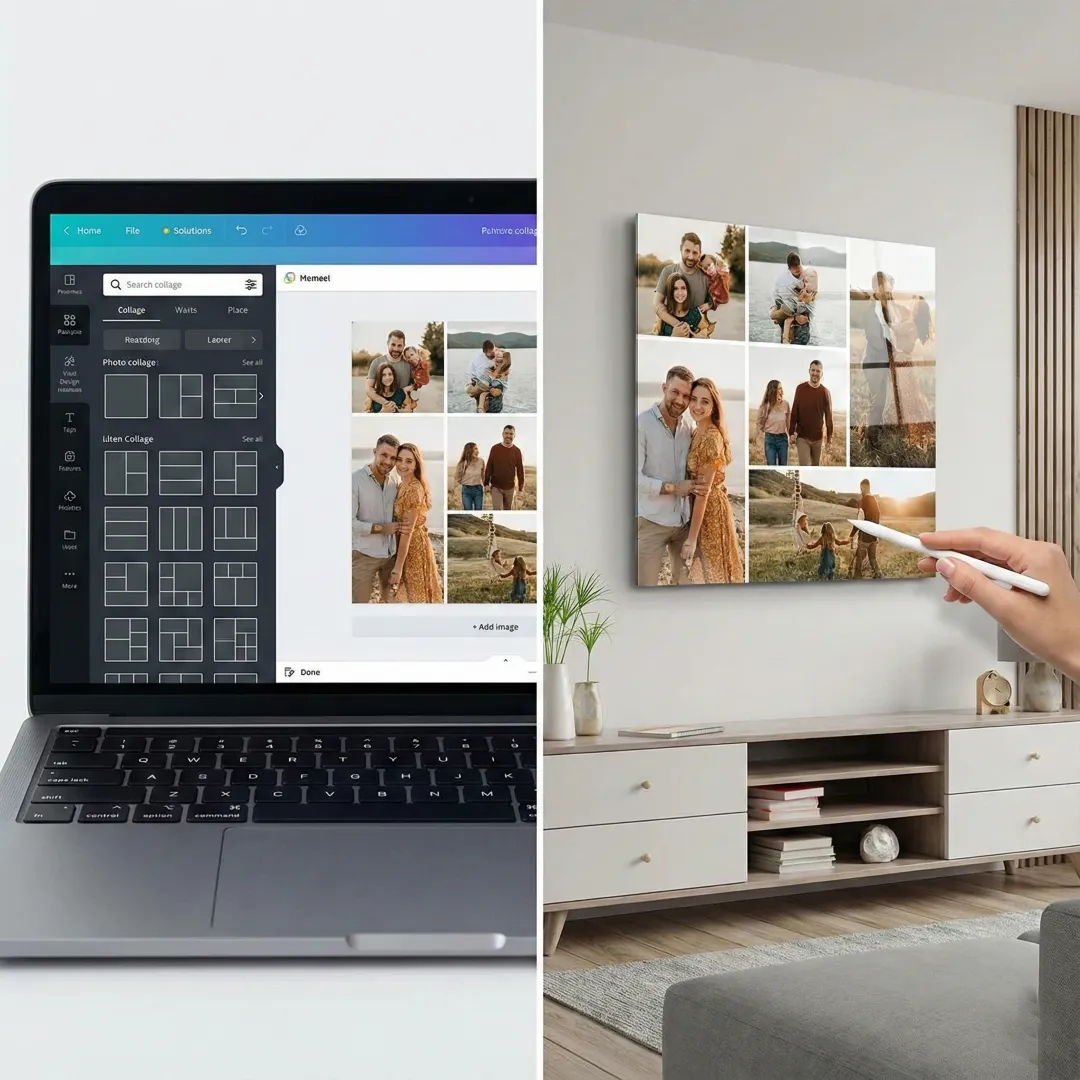
Step 2: Choose the Best Online Collage Maker
The internet is filled with tools that make it easy to create a photo collage online. You don’t need expensive software or advanced design skills. Many of these platforms are free and incredibly user-friendly.
Top Online Tools for Creating Your Collage:
| Tool | Key Feature | Best For |
| Canva | Vast library of templates and easy drag-and-drop interface. | Beginners and quick, stylish designs. |
| Adobe Express | Professional templates and strong integration with Adobe fonts. | Users who want a polished, high-end look. |
| Fotor | Simple interface with a focus on classic grid layouts. | Creating clean, straightforward collages quickly. |
| Teo Print’s Tool | Designed to perfectly format your collage for printing. | Ensuring your file is print-ready from the start. |
When you use an online photo frame maker, you can experiment with different layouts without committing. Upload your photos and see what works best for your story.
Step 3: Design Your Layout
This is where your vision starts to take shape. Your layout determines the rhythm and flow of your collage. Most online tools will offer templates for different arrangements, but understanding the principles will help you customize them effectively.
Select a Layout Style
- Grid Layout: This is the most popular style for a reason. It organizes photos into clean rows and columns, creating a modern and orderly look. You can use a symmetrical grid for a balanced feel or an asymmetrical grid to make one photo the star.
- Scattered or Freeform: This style overlaps photos for a more dynamic, scrapbook-like effect. It can be playful and artistic but works best when you leave enough white space to avoid looking cluttered.
Pro-Tips for an Effective Layout:
- Create a Focal Point: Choose one main photo to be the centerpiece. This is often the largest image in the collage and should be your most powerful or meaningful shot.
- Balance Your Images: Distribute your photos evenly. Mix close-ups with wide shots and balance light and dark photos across the canvas to create visual harmony.
- Mind the Gaps: Pay attention to the spacing between photos. Consistent borders give your photo collage online a professional, gallery-quality appearance.
Step 4: Refine and Finalize Your Design
With your photos in place, it’s time for the finishing touches. A few simple refinements can elevate your design from good to great.
- Create a Consistent Tone: If your photos have different lighting and color profiles, they can look disjointed. Use a simple photo editor (many collage tools have one built-in) to apply a consistent filter or adjust the saturation and brightness across all images. For a classic, elegant look, convert all photos to black and white.
- Add a Background: While a simple white background is clean and modern, a subtle color or texture can add personality. Choose a background that complements the colors in your photos without overpowering them.
- Be Cautious with Text: If you want to add a date, name, or short quote, choose a simple, readable font. Place it in a location where it doesn’t obstruct key parts of your photos.
Step 5: Export and Prepare for Acrylic Printing
You’ve designed the perfect photo collage online—now it’s time to prepare it for printing. The quality of your export file is critical for getting a stunning acrylic print.
- Set the Right Resolution: Export your collage at the highest possible resolution. The industry standard for high-quality printing is 300 DPI (dots per inch). A lower resolution will result in a blurry or pixelated print.
- Save in the Correct Format: JPEG or PNG are the most common file formats for printing. JPEG is great for photos, while PNG is ideal if your collage has transparent elements.
- Choose Your Acrylic Print: Once you have your file, head to a printing service. You’ll upload your design and select your acrylic print options. This often includes choosing the size, thickness of the acrylic, and the type of finish (glossy or matte). Our guide on acrylic vs. metal prints can help you weigh different modern printing options.
Finally, place your order and get excited! Your custom piece of art will soon be on its way.
Conclusion: From Digital Memories to Tangible Art
Designing a photo collage online is a simple and rewarding way to turn your favorite memories into a work of art. By following these steps—from curating your photos and choosing a layout to preparing your file for print—you can create a professional-quality piece you’ll be proud to display.
Printing your collage on acrylic adds a layer of modern sophistication, transforming your personal story into a stunning statement piece. Your memories deserve to be seen, and now you have the perfect way to showcase them.
Frequently Asked Questions (FAQs)
Q: Can I make a photo collage on my phone?
A: Yes, many apps like Canva and Adobe Express have excellent mobile versions that allow you to create a high-quality photo collage directly from your phone. Just make sure to export the final file at full resolution.
Q: What is the best resolution for a large acrylic print?
A: For any print, aim for 300 DPI at the final print size. For a large acrylic print, this means each individual photo within your collage should be high-resolution to avoid looking blurry when scaled up. Always use the original photo files.
Q: How do I choose between a glossy or matte acrylic finish?
A: A glossy finish makes colors appear more vibrant and adds a sense of depth, but it can create glare in brightly lit rooms. A matte finish minimizes reflections for a softer, more subtle look. The choice depends on your personal preference and where the art will be displayed.
Q: What is the difference between an acrylic collage and a multi-photo frame?
A: An acrylic collage is a single, seamless print where all photos are digitally combined. A multi-photo frame holds several individual physical prints. The acrylic collage offers a sleeker, more modern aesthetic. Dive deeper into the topic with our comparison of multi-photo collage frames vs. acrylic photo collages.
Q: How many photos should I use in my collage?
A: While there is no strict rule, it’s best to avoid overcrowding. For most wall art, a range of 5 to 15 photos works well. This allows each image to be large enough to be seen clearly without overwhelming the viewer. You can find inspiration in these 15 inspiring collage frame ideas.
Q: Is it expensive to print a photo collage online on acrylic?
A: The cost depends on the size, thickness, and supplier. While acrylic prints are more of an investment than paper or canvas, their durability and stunning visual impact make them a great value. They are an excellent example of a premium custom printed gift.Q: Can I create a collage with different shapes, like a heart?
A: Yes! Some online tools allow you to create collages within specific shapes. A heart-shaped collage can be a wonderful gift for an anniversary or Valentine’s Day. There are many options for custom shape frames and designs.