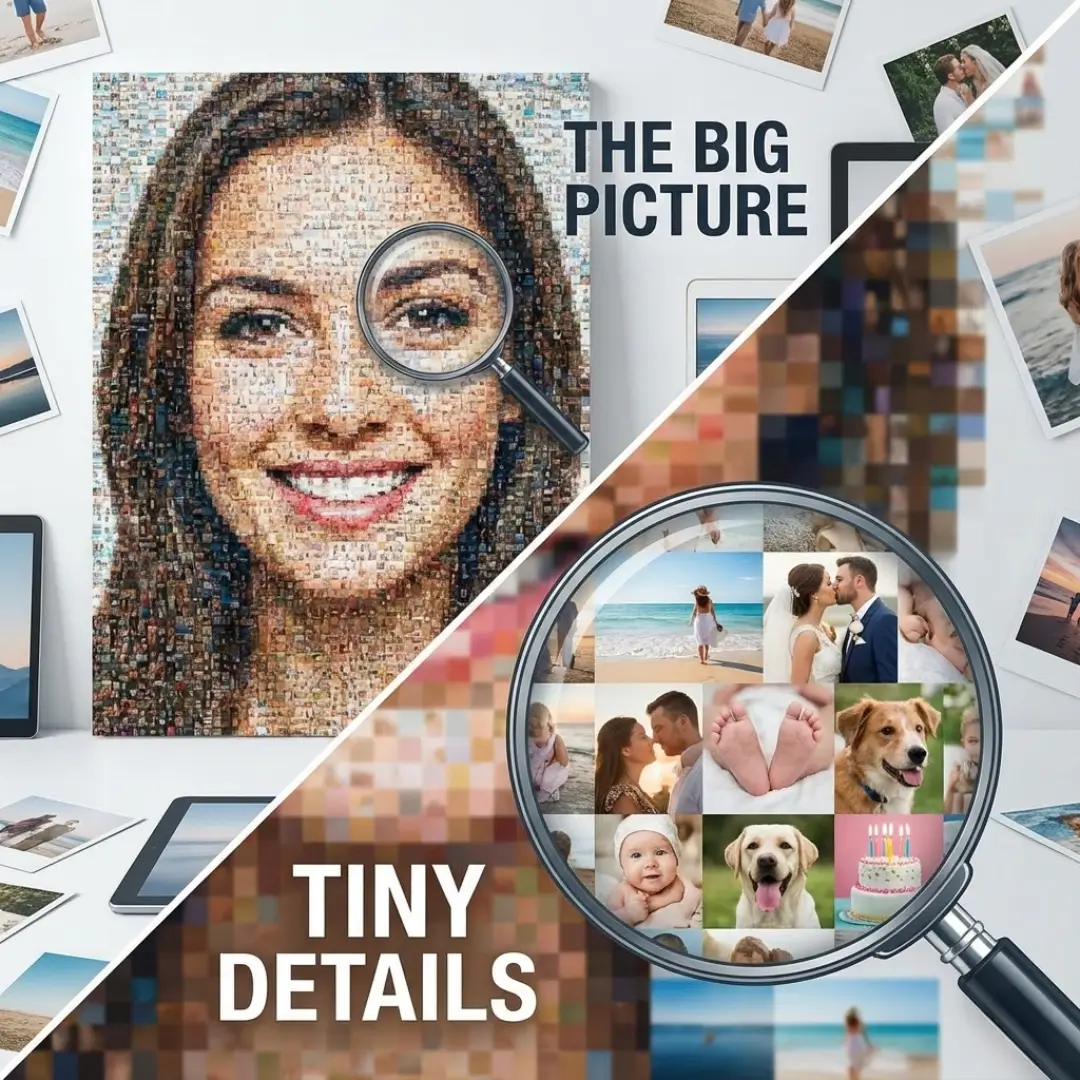
Have you ever looked at a picture from a distance, only to step closer and realize it’s made up of hundreds of smaller images? That moment of discovery is pure magic. This is the unique appeal of a mosaic photo collage. Unlike traditional layouts that sit side-by-side, a mosaic blends countless tiny photos to form one larger, main image.
It’s the ultimate way to tell a complete story. You don’t have to choose just one favorite photo; you can use them all to build something greater. Whether it’s a portrait of a bride made up of every guest at the wedding, or a pet’s face created from years of playful snapshots, the result is breathtaking.
However, creating one can seem complicated. How do you make sure the little pictures don’t disappear? How do you choose the right main image? In this guide, we will walk you through everything you need to know about creating a stunning mosaic photo collage that transforms your memories into a masterpiece.
What is a Mosaic Photo Collage?
A mosaic photo collage, often called a photographic mosaic, is a digital art form where a single large image is constructed using hundreds or even thousands of smaller, tile-sized photos.
From far away, your eyes blend the colors and tones of the small tiles to see the main subject—perhaps a family portrait or a landscape. Up close, the main image dissolves, and you can clearly see the individual details of each tiny photo. It offers two viewing experiences in one: the “big picture” and the intricate details that make it up.
Why Choose a Mosaic Style?
- Zero Compromise: You don’t have to narrow down your selection to just 5 or 10 photos. You can use hundreds.
- Interactive Art: It invites people to step closer and explore. It’s a conversation starter in any room.
- Deep Storytelling: It literally shows that a person or event is “made up” of many smaller moments.
For those looking for something different than standard grids, this style is one of the most unique creative photo collage ideas beyond the grid.
Selecting the Right Photos
The success of your mosaic photo collage depends entirely on the photos you choose. You need two distinct types of images: the “Source” (main) image and the “Tile” (small) images.
1. The Main Source Image
This is the big picture that everyone will see from a distance. Not every photo works well for this.
- Simple is Better: Avoid busy backgrounds or group shots with tiny faces. A close-up portrait, a pet, or a simple object (like a heart or ring) works best.
- High Contrast: Images with good lighting and clear distinction between light and dark areas translate better into a mosaic.
- Vibrant Colors: A colorful main image gives the software more data to match with your tile photos.
2. The Tile Images
These are the building blocks. You need a lot of them—usually between 500 to 2,000 photos for a high-quality result.
- Variety is Key: You need a mix of colors and brightness levels so the software can “paint” the main image correctly.
- Don’t Worry About Perfection: Since these images will be small, slight blurriness or imperfect lighting in individual shots won’t ruin the final effect.
- Gather Everything: This is the perfect opportunity to empty your camera roll. Use travel snaps, candid moments, and everyday photos.
If you are struggling to find enough photos, you might look into family photo collage ideas to gather images from different family members to boost your collection.
How to Create Your Mosaic Photo Collage
While it looks incredibly complex, you don’t need to be a Photoshop wizard to make one. Specialized software does the heavy lifting.
Step 1: Choose Your Software
There are manual ways to do this, but they take hours. Using an automated tool is much faster. Many free online photo collage makers now offer mosaic features or specific plugins.
Step 2: Upload and Process
Once you upload your main image and your folder of tile images, the software analyzes the colors. It places the small photos where their dominant colors match the main image. For example, a blue sky in your main photo will be filled with small photos that have a lot of blue in them (like ocean shots or denim).
Step 3: Refine the Details
Most tools allow you to adjust the “blending” level.
- High Blending: The main image is clearer, but the small photos might look tinted or faded.
- Low Blending: The small photos are crisp, but the main image might look more abstract or pixelated.
Finding the right balance is key. If you are new to digital layouts, checking a guide to design a photo collage online can help you navigate these settings.
Best Materials for Printing Mosaics
Because a mosaic photo collage relies on tiny details, the printing medium matters immensely. You need a surface that is smooth and can hold high-resolution ink dots without bleeding.
Acrylic Prints
Acrylic is widely considered the best option for mosaics. The surface is completely smooth, allowing for razor-sharp printing. The light refracts through the acrylic, making the colors pop and ensuring the tiny images remain distinct.
- Detail: Unmatched sharpness.
- Vibrancy: Colors look deep and luminous.
- Durability: Shatter-resistant and UV protected.
If you want to create a show-stopping piece, learning how to create a stunning photo collage for acrylic printing is highly recommended.
Metal and High-Quality Photo Paper
Metal prints (aluminum) are also excellent for sharpness. High-quality luster or glossy photo paper works well too, provided it is framed behind glass to protect the fine details. Canvas is generally not recommended for mosaics because the texture of the fabric can distort the tiny tile images.
Creative Theme Ideas
A mosaic photo collage is a versatile gift or decor piece. Here are some themes to inspire you:
The “First Year” Baby Mosaic
Use a close-up of your baby’s smiling face as the main image. Fill the tiles with every photo you took during their first 12 months. It visually represents how their first year “made” them who they are. This is a unique twist on the traditional baby photo collage.
The Wedding Mosaic
Use a romantic portrait of the couple as the source image. The tiles can be hundreds of candid shots from the wedding day, or photos of the couple’s relationship leading up to the marriage. It’s a powerful way to preserve wedding collage prints in a single, artistic display.
The Pet Tribute
Take a great portrait of your dog or cat. Use photos of them playing, sleeping, and growing up as the tiles. It’s a beautiful memorial or celebration of a furry friend.
Conclusion: The Ultimate Big Picture
A mosaic photo collage is more than just a technique; it’s a perspective. It reminds us that our lives are big pictures made of thousands of tiny, beautiful moments. It allows us to keep all those memories visible without cluttering our walls with hundreds of frames.
By selecting the right main image, gathering a large collection of tile photos, and choosing a high-definition print medium like acrylic, you can create a piece of art that is truly mesmerizing. Whether for your own home or as a heartfelt gift, a mosaic collage ensures that every little detail counts.
Ready to start? Gather your photos and start building your masterpiece today.
Frequently Asked Questions (FAQ)
Q: How many photos do I need for a mosaic photo collage?
A: For a good result, aim for at least 500 photos. The more photos you have, the less often they will repeat, making the mosaic look more natural. Some software can work with fewer by repeating images, but 1,000+ is ideal for high detail.
Q: Can I use the same photo multiple times in a mosaic?
A: Yes, most mosaic software will automatically repeat photos to fill the grid. However, to keep the “tile” images interesting for the viewer, it is better to have a large variety of source photos so repetitions aren’t obvious.
Q: What is the best subject for the main image?
A: The best main image is simple, high-contrast, and colorful. A face, a pet, a logo, or a simple shape works best. Avoid group photos or landscapes with lots of tiny details, as these will get lost when converted into a mosaic.
Q: How big should I print a mosaic photo collage?
A: Mosaics need to be printed large so the tiny tile photos are visible. A minimum size of 20×30 inches is usually recommended. If you print too small, the individual tiles will just look like colored dots.
Q: Why do my tile photos look tinted?
A: This happens due to “blending.” The software overlays the main image onto the tiles to help the big picture stand out. You can usually adjust this opacity. Less blending makes tiles clearer but the main image fainter; more blending makes the main image clear but tints the tiles.
Q: Is acrylic or canvas better for mosaic collages?
A: Acrylic is much better. The texture of canvas can distort the tiny images that make up the mosaic. Acrylic is perfectly smooth and crystal clear, ensuring every small photo is sharp and readable.
Q: Can I make a mosaic photo collage on my phone?
A: Yes, there are apps available for creating basic mosaics. However, for a high-resolution file suitable for large-scale printing, desktop software or web-based tools are usually more powerful and offer better control over the final output.